Thanks to all those chaps who helped advise the way to correct my blogging folly. Greatly appreciated!
We took advantage of the Easter long weekend in Australia to play a game up stairs of Big Chain of Command. For quite a few months Ben has been building up a British force mainly consisting of some old style Scots that I have had for a while as well as his own separate force of Commandos. He has also discovered the joys of researching, planning. building, painting and modelling his own armoured vehicles. Ben even planned the scenario and gave both his brother Alex and I the choice of force we would like and put together two splendid briefings. Not bad for his first effort I thought.
It's what wargaming is all about after all!
The briefing was made out the evening before.
With the arrival of the German AFV and the unsupported British armour being gutted the battle was over. The Germans had held on and their decision to go with two infantry platoons proved a wise one. In retrospect, Ben should have allowed himself another British platoon as he was on the attack against an enemy with the advantage of terrain however the learning curve will rapid.
Alex played a solid game though the "Lets wait and let them come to us" philosophy still needs some work.
The force is strong in that one!
 |
| Some British troops may be in for a shock in a few seconds... |
We took advantage of the Easter long weekend in Australia to play a game up stairs of Big Chain of Command. For quite a few months Ben has been building up a British force mainly consisting of some old style Scots that I have had for a while as well as his own separate force of Commandos. He has also discovered the joys of researching, planning. building, painting and modelling his own armoured vehicles. Ben even planned the scenario and gave both his brother Alex and I the choice of force we would like and put together two splendid briefings. Not bad for his first effort I thought.
It's what wargaming is all about after all!
 |
| The table set up from the western edge |
 |
| Looking down from the point of the British advance at the northern edge |
The briefing was made out the evening before.
 |
| Patrol phase over and the first German squad deploys |
 |
| From this angle you can see the vicinity of the Scottish Platoons first jump off point. |
 |
| On the eastern flank Alex has deployed his first squad and is desperate for some action. More on that later. |
 |
| Corporal Cummings leads his men down past the old farmhouse ruin. These lads were in the thick of the action all day. |
 |
| Overwatch is an excellent command to give troops in a strong postion |
 |
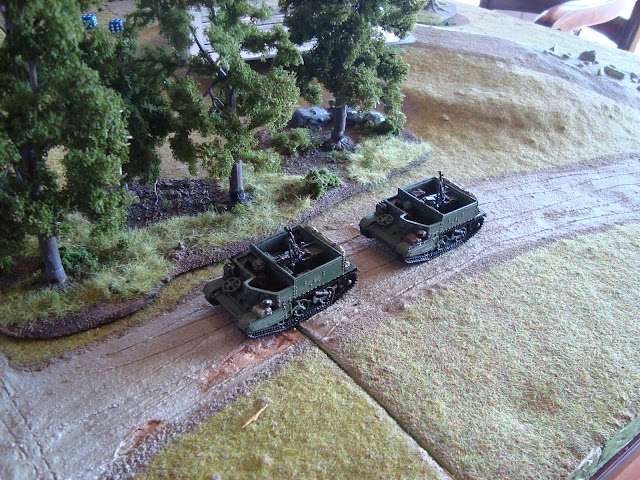
| Though not 100% finished and still needing their markings, the Recce section of two Universal Carriers arrive on the field |
 |
| The fire fight between two squads MG42's and the remaining Scots is going as expected - poorly for the allies. |
 |
| These brave scouts are now left between a rock and a hard place. Exposed and under fire from the Carriers. |
 |
| A great, if somewhat blurry shot, of a squad on the move to support |
 |
| There are those scouts about to cop an absolute shellacking! |
 |
| Not a good spot to be caught - in the open on the crossroad. |
 |
| Here comes the 7th Armoured lead vehicles - Cromwell on the move |
 |
| Another view of the first Scottish section. They would take part in three close assaults and win them all! |
 |
| Toilet Tissue bridge made for me many years ago by the famous Matt "Bluewillow" Williamson. Still getting lots of use in all manner of genres Matty! |
 |
| Sherman Firefly appears on the field. At this stage it is obvious if the Germans will have any armoured support it will only be in the form of limited support if at all. |
 |
| Still they push on with the Universal Carriers trying desperately to do the absent infantry's job. |
 |
| Unfortunately you can't always see everything! |
 |
| Finally the one German support option arrives in the form of a Panzer IV |
 |
| The Germans have now staved off the Scots assault and are in consolidation mode on the western flank |
 |
| Alex deploys his third and final squad near the bunker and in good cover |
 |
| He is still keen for action though and soon that cover will be left and the lads will go Sherman hunting! |
 |
| After exchanging long range fire with the PzIV and being desperately unlucky the Firefly takes a shell to the fuel tank and brews up like a factory full of firecrackers. |
 |
| With two markers representing shock a roll of 11 or 12 was needed to hit...well done that man. |
 |
| Victory is ours1 |
With the arrival of the German AFV and the unsupported British armour being gutted the battle was over. The Germans had held on and their decision to go with two infantry platoons proved a wise one. In retrospect, Ben should have allowed himself another British platoon as he was on the attack against an enemy with the advantage of terrain however the learning curve will rapid.
Alex played a solid game though the "Lets wait and let them come to us" philosophy still needs some work.
The force is strong in that one!


0 Komentar The Scots take on the Germans - Big Chain of Command on the RIGHT Blog!
Post a Comment